
#pragma mark and custom warnings and error in XCode
- Shubham Bakshi
- Apr 27, 2024
- 3 min read

Updated: May 9, 2024

Let’s make your iOS Project easier to read and navigate through!
The goal of this article is not writing code that compiles faster or writing shorter code using higher order functions but more of a good programming practice. So repeat after me:

We spend hours and hours coding in front of our screen and spend days or months or even longer to create a product that we can finally show to our client. Sometimes , we are in such a hurry for completing our code that we essentialy forget putting out comments . And then, after say a long vacation (for the successful launch of the product), you come back to work on your codebase and you just sit in front of that screen, wondering, why in the world did I wrote that logic:

Face it, if you’re not using comments in your code, you have probably faced the same situation like this one.
But, the point of this article are not comments, but rather, #pragma mark. #pragma mark is an Objective-C terminology and there is no definite name for it in Swift programming language. So i will call them, pragmas (as there are more than just one #pragma mark).
Let’s write a code for a simple tableView with some of its delegate and dataSource methods to best show pragmas use-case.

And if you click on the No Selection (maybe showing a method in your case ) on the jump bar at top :

You’ll see this :

All the methods and variables are present there as a collection without any separation between them, which, to be honest, look ugly.
The code will work fine, but, to be honest, without all the comments and no separation between what are data source methods and what are delegate’s, it looks a bit messy. So let's clean up the code a little by adding comments and separating the UITableView 's dataSource and delegate methods by introducing extension.


This cleans up our code a bit and provides separation between data source and delegate methods. /// on top of our tableView object is not actually a comment but rather a documentation markup in Xcode, which are a bit different from comments. I would not explain that here, as it will just add lengths to the article.
Now coming back to the point, we’re halfway through. If we again click on that jump bar , we will now see extensions to the view controller added to it with the methods separated, but it still doesn’t tell what’s what.

Now here’s where our pragmas come in handy.
Pragmas are , you can say, special type of comments that start with a particular keyword , and then let us define/write what we want.
They always start with // and not /// as /// signifies documentation markup and // signifies comments. This // is followed by MARK keyword as is, all capitalised and followed by a : with no space in between . So your final keyword will look like this — // MARK: . Even if you add this , you wont get much in the jump bar, just an icon with a blank space after it.
The magic lies in what you write after this . Whatever you write after this keyword will be added exactly like that in the jump bar. But first, if you want some separation , say like a horizontal line, between different pragmas, you need to add - . Now it will look like // MARK: - . Now, everything you write after this will be added as such inside the jump bar . Let’s have some fun, shall we :

I created // MARK: — Custom UI Elements and the same text is added to the jump bar. Now let’s complete our View Controller and fill it with pragmas.


You’ll have to admit that with just a few modifications , our code looks cleaner. And above all , our jump bar looks like this —
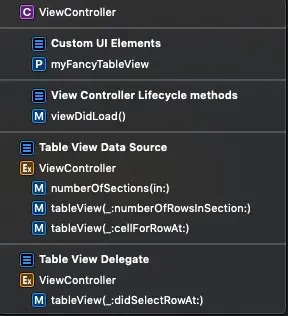
Here’s a quick little comparison of the two approach —

Other than MARK we have a bonus of TODO: and FIXME: as well , which have different icons in the jump bar as well and which follows the same pattern as the pragma we defined above : // MARK: -
Other than pragmas, if we wanted to define our custom made warnings and error in Xcode , we can make use of #error(“”) and #warning(“”) as follows:


